When you define your service offerings in Microsoft Bookings, you can set a service name, description, location, duration, default reminders, and more. This lets customers see exactly what types of appointments are available when they come to your website.
Create the Service Details
- In Microsoft 365, select the app launcher, and then select Bookings.
- In the navigation pane, select Services > Add a service.
- Enter the service details including name, description, and location. Here, you can choose to make the meeting online.
- Enter the duration required for the service.
- If necessary, select a price model and set the default price under Price and payments.
- Enter additional notes and reminder information.
- Select Save.
Assign a Staff Member to the Service
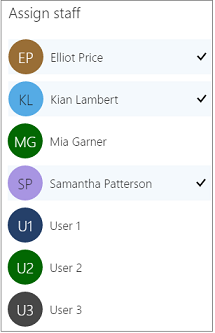
- On the Services page, select those employees who are qualified to provide this service. You can select one or more. Selected employees have a check mark next to their names.
- Select Save
Set Publishing and Scheduling Policy Options
- On the Services page, under Publishing options, clear the check boxes next to Show this service on the booking page and/or Use the default scheduling policy.
- Set the scheduling policies for this service.
- Select Save.
Add an Online Meeting Option to Bookings
When you or a customer creates a new booking, you have the option to make it an online appointment using Microsoft Teams.
- On the Services page, select the toggle to turn on online meetings.
- Select Save.
Group Bookings
- On the Services page, under Maximum number of attendees, enter the number of people who can attend this event. Once you set the maximum number, the attendee list can't exceed the number you set. By default, this field is blank.
- Select Save.
Related Articles
