If someone needs to e-Mail to a Large number of recipients (approximately 100 or more), or send a large number of e-mails to multiple recipients (approximately 100 or more), you'll want to use a massmail profile. See attached PDF
Mass Mail Instructions Word Doc
Step-by-step guide
...
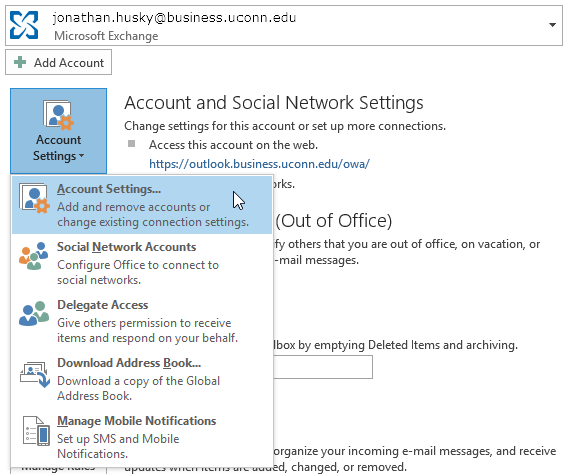
2. Click Account Settings,
3. Choose on “Account Settings”
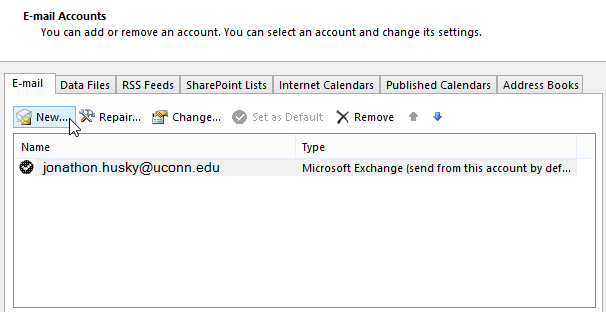
4. Click on “New”
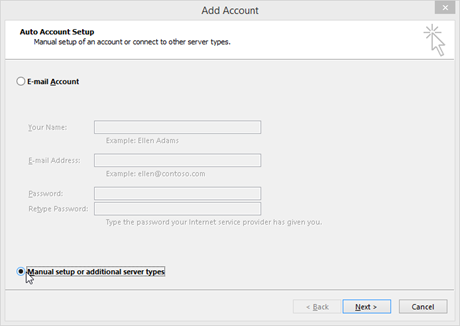
5. Select “Manual setup or Additional Server types”; Click Next
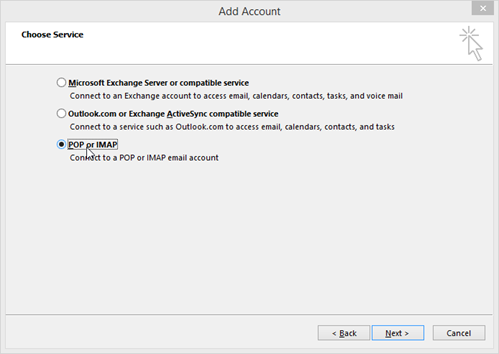
6. Select “POP or IMAP”; Click Next
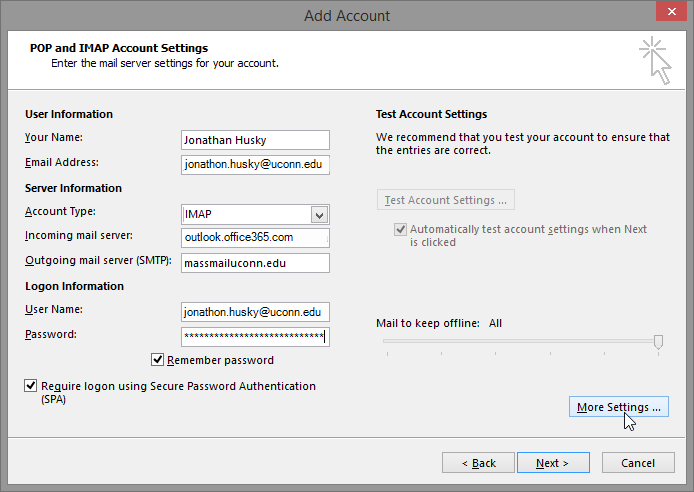
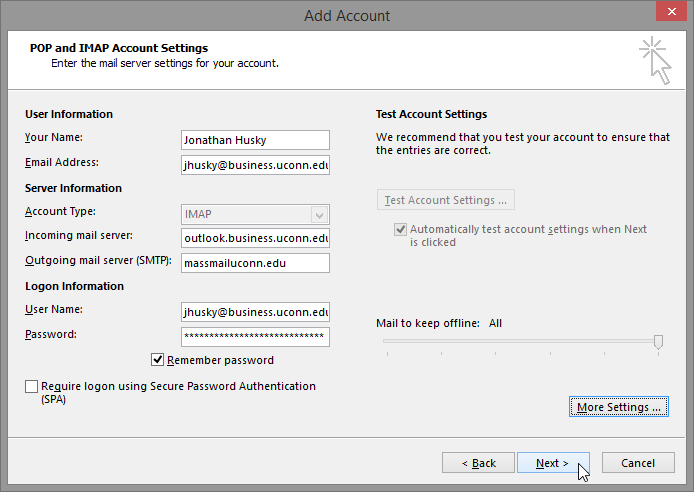
7. Fill out the Account Information and Server information Accordingly. Note: Incoming mail server will either be ‘mail.business.uconn.edu’ or ‘outlook.business.uconn.edu’ depending upon where your mailbox exists. Outgoing (SMTP) server is ‘massmail.uconn.edu’ Once filled out – Choose “More Settings” All login settings should correlate with your school of Business Mail account.
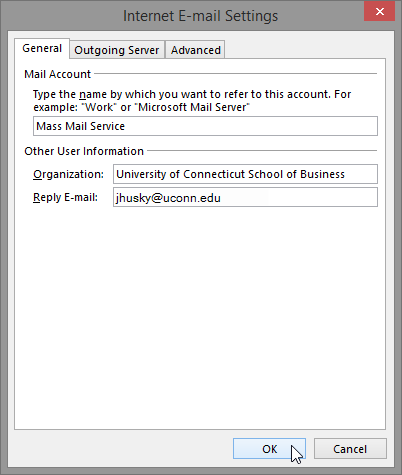
8. Fill out the general information – Suggested Name for the account “Mass Mail Account”
9. Fill out the Outgoing server information. Select “My outgoing server (SMTP) requires authentication” – Put in your NetID and Password. Ensure remember my password is checked
10. Fill out the incoming Server Settings: Incoming should be “SSL – Port 993” / Outgoing choose “TLS” and CHANGE the port setting to be “587” then click “OK”
11. Click “Next”
12. Account settings will be tested
...
researchers, faculty or staff need to email 100 or more recipients outside of the uconn.edu domain the university's Mass Mail Service should be used.
Configuring Outlook to Use Mass Mail Service.pdf
Configuring Outlook to Use Mass Mail Service
On the business.uconn.edu domain connected laptop open Outlook.
Click on File.
Click Account Settings.
Choose on Account Settings...
Click New...
Select “Manual setup or additional server types”
Click Next.
Select “POP or IMAP.”
Click Next.
Enter your name in the Your Name Field.
Enter your email address in the Email Address field.
Choose IMAP from the Account Type drop-down box.
In the Incoming mail server field enter ‘outlook.office365.com'
In the Outgoing mail server (SMTP) field enter ‘massmail.uconn.edu’
Enter your office 365 logon information in the Logon Information field. Check both boxes.
Click More Settings...
Name the mail account Mass Mail Service.
Enter the organization you represent in the Organization field.
Enter your current School of Business email address in the Reply E-mail field.
Click on the Outgoing Server Tab.
Select My outgoing server (SMTP) requires authentication.
In the User Name field enter your NetID.
In the Password field enter your NetID password. Select the option to Remember my password.
Click on the Advanced Tab.
Enter 993 for the Incoming Server (IMAP) port.
In incoming server's Use the following type of encrypted connection drop-down box choose SSL.
Enter 587 for the Outgoing Server (SMTP) port.
In Outgoing Server's Use the following type of encrypted connection drop-down box choose TLS.
Click OK.
Return to the Add account window.
Click Next>.
Account settings will be tested
Status should show ‘completed’ for both settings.
Click on “Close”
...
...
Click on “Finish”
...
...
Note the newly created ‘Mass Mail
...
Service’
Click Close.
Return Outlook.
Locate the mailbox ‘Mass Mail
...
Service’
Create a new message
...
Click the From: drop-down box if Mass Mail
...
Service is not selected
...
.
Select Mass Mail
...
Service
...
...
Complete your e-mail
...
and when ready,
...
click Send.
...
| Info |
|---|
Related articles
| Filter by label (Content by label) | ||||||||||||||||||||
|---|---|---|---|---|---|---|---|---|---|---|---|---|---|---|---|---|---|---|---|---|
|
| Page Properties | ||
|---|---|---|
| ||
|
1.


