...
Number of Attempts
- Default: 1 Attempt
- To allow more than one attempt, check the Multiple Attempts box and indicate Unlimited, or enter a specific number of attempts.

| Note |
|---|
For multiple attempts, instructors need to specify which attempt score appears in the Grade Center column. Instructors can choose to have the First, Last, Average, Lowest, or Highest score display. Default is set to Last. To modify this setting,
|

Force Completion
- Default: No
- Recommended: NO FORCE COMPLETION

If Checked: Students cannot re-enter a test if it closes, either on purpose or due to a technical problem.
- If Un-checked: Students can re-enter a test if it closes, but only if the test is still available, i.e. the display period has not ended and the allotted time from the start of the test has not expired.
| Note |
|---|
To enforce a time limit,
For more information regarding time limits, review the below section, Set Timer. |
Set Timer
- Default: No
- Recommended: Time limit with Auto-Submit ON
Check the box to be able to enter a time limit.
- Change Auto-Submit to ON to enforce the time limit.

| Note |
|---|
Setting a time limit without Auto-Submit allows students to keep working and submissions past the time limit will not be graded automatically. The instructor will need to view attempts and re-submit for the grade to be recorded. |
Display Dates
- Default: None
- Display dates control the visibility of the link to the test as well as the appearance of the test column in My Grades. Check appropriate boxes to enter start and/or end dates.

| Note |
|---|
Display Until date ends visibility of test link and if that test is not taken by a student, the test will not appear in My Grades after the Display Until date. |
Due Date
Default: None
Note To end student access to a test but maintain the listing of untaken tests in My Grades, use the Due Date option, described below.
Due Dates will appear to students in the Course Calendar, My Grades, and the Class Work Due Dates module on the My Courses page in HuskyCT.
Check Due Date and enter date.
- Check Do not allow to prevent students from being able to take the test after the Due Date.

| Note |
|---|
This combination of settings will end the test availability period but keep the test link visible on the site and the test column visible in My Grades if test not taken. This could be used to make students aware of when tests were due and any missed tests. |
Test Availability Exceptions
- Default: None

This setting is most commonly used to provide an accommodation for extra time for one or more students.
Click on Add User or Group and browse for the student. Additional students must be added separately unless they are placed in a group.
- Current test settings will display. Adjust as needed. The most frequently applied change is extending the allotted time.

| Note |
|---|
This combination of settings will allow students in the exceptions space to take the exam as such, unless the option to not allow students to take the test after the due has passed is checked. In order to allow availability exceptions past the due date, turn off the setting to prevent students from taking the test after the due date. If that setting is off but there is still a due date, turn off the due date setting altogether. Students who take the the test after the due date will have Late marked as a notation to their attempt. For this reason, you may decide to remove the due date entirely. Additionally, test availability can be modified to deny access to the exam to any students not included in the availability exceptions. |
Self-assessment Options
| Warning |
|---|
| Please review the information in this section carefully before administering an exam. Failure to do so runs the risk of losing all test results. |
...
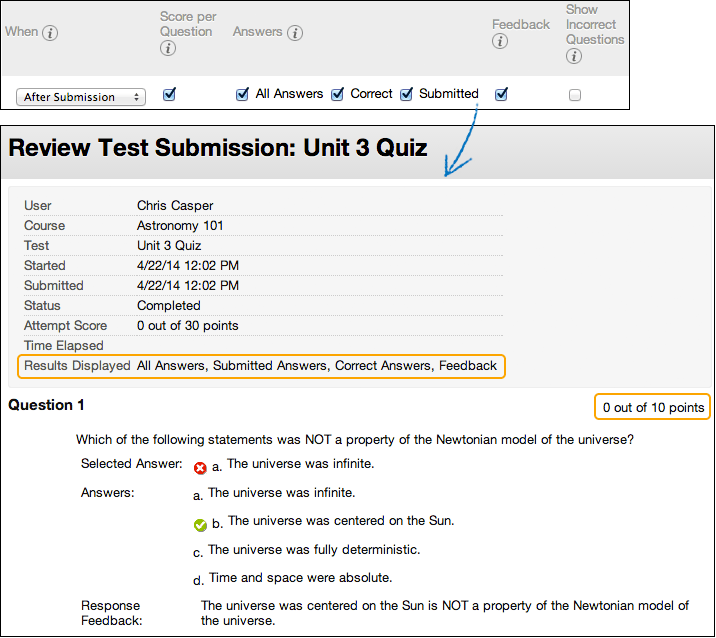
Default: After Submission and Score per Question
- The default settings shown below will result in students seeing each test question and the score obtained for that question as soon as they submit their test, and then afterwards using My Grades.

| Note |
|---|
Unchecking the Score per Question box will limit score results to total test score, but to prevent students from seeing the total test score, you will need to also set the test column in the Grade Center to Hide from Users. |
Options:
When
| Expand |
|---|
You must make a selection. Set when appropriate test results and feedback are shown to students:
|
Score per Question
| Expand |
|---|
Show the score earned for each test question. This option is a default for tests only. Clear the check box if you don't want to show scores for individual questions. |
Answers
| Expand |
|---|
You can allow students to see information about their answers:
Example 1: Show more feedback When students access their tests, they see their overall scores, each question's score, and all answer options. They see their submitted answers marked as correct or incorrect, and any feedback provided. Example 2: Show less feedback to discourage cheating If students take a test at different times, you can make a limited amount of feedback available until all students submit the test. For the first rule, select After Submission in the first menu and clear the check box for Score per Question. Make no other selections. After they submit their tests, students can only see their overall test scores. For the second rule, select After Due Date and select options to show more results and feedback. You can create an announcement to notify students that additional feedback is available to view. |
Feedback
| Expand |
|---|
Show instructor-generated feedback for each question. This option appears for tests only. |
Show Incorrect Questions
| Expand |
|---|
Show the questions a student answered incorrectly or partially incorrectly. This option appears for tests only. You might show incorrect questions and allow multiple attempts so that students can focus their studying on those areas. |

| Warning |
|---|
This option may result in none of the students seeing the test results if anyone has not taken the test.
|

...
Force Completion: OFF
Timer ON with a time entered
- Auto-Submit: ON
| Note |
|---|
Common Misconception: That a student will be able to enter a test with a 60 minute time limit, spend 15 minutes, then leave for an hour or two, then come back and use the remaining 45 minutes. THIS IS NOT THE CASE. Once the student starts the test, the timer counts down and at the end of the 60 minutes the test will submit. Any time the student spends away from the test is lost. |
Display Dates and Due Date
Enter a Display After date for the start of the availability period.
Do not enter a Display Until date.
Enter a Due Date which marks the end of the availability period.
- Check the box for Do not allow students to start Test if due date passed.
| Info |
|---|
Rationale: This combination of settings will determine a start date for the test and enforce an end date. In addition, it will make it clear to students if they did not take a test during the time that it was available. Once the Due Date has passed, students will still see the link for the test, but when they attempt to begin the test a message will display to tell them they are no longer allowed to take it. If a date is entered for Display Until, then the link to the test will completely disappear from the students’ view and if a student did not take the test, My Grades will no longer display that item either, making it nearly impossible for a student to determine if they took a test or not. |
Test Results and Feedback
- Do not use the After Attempts are Graded option.
- If you do not want students to see any score information, uncheck the box for Score per Question and set the Grade Center column for the test to Hide to Users.
| Info |
|---|
Rationale:
|
Test Presentation
All at Once presentation results in fewer issues while taking a test.
If questions delivered One at a Time, do not Prohibit Backtracking.
- If there are no Question Sets or Random Blocks, then you can check Randomize Questions. If test questions were added in Question Sets or Random Blocks, do not select Randomize Questions.
| Info |
|---|
Rationale:
|
| Info |
|---|
Still need help? For more information or assistance with HuskyCT, contact the Educational Technology Office at edtech@uconn.edu or (860) 486-5052. |
...